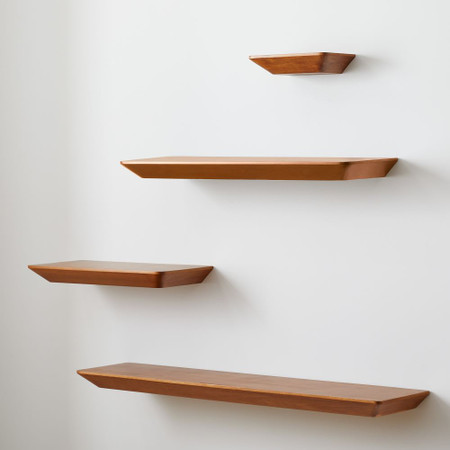
1.Install floating shelves
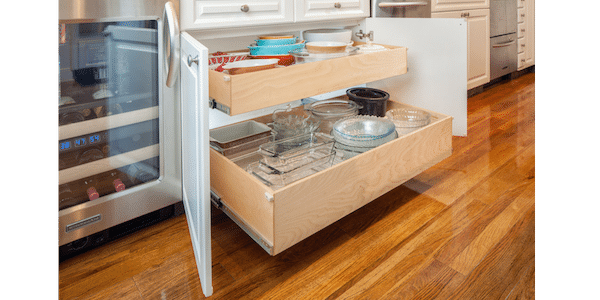
2.Use pull-out drawers
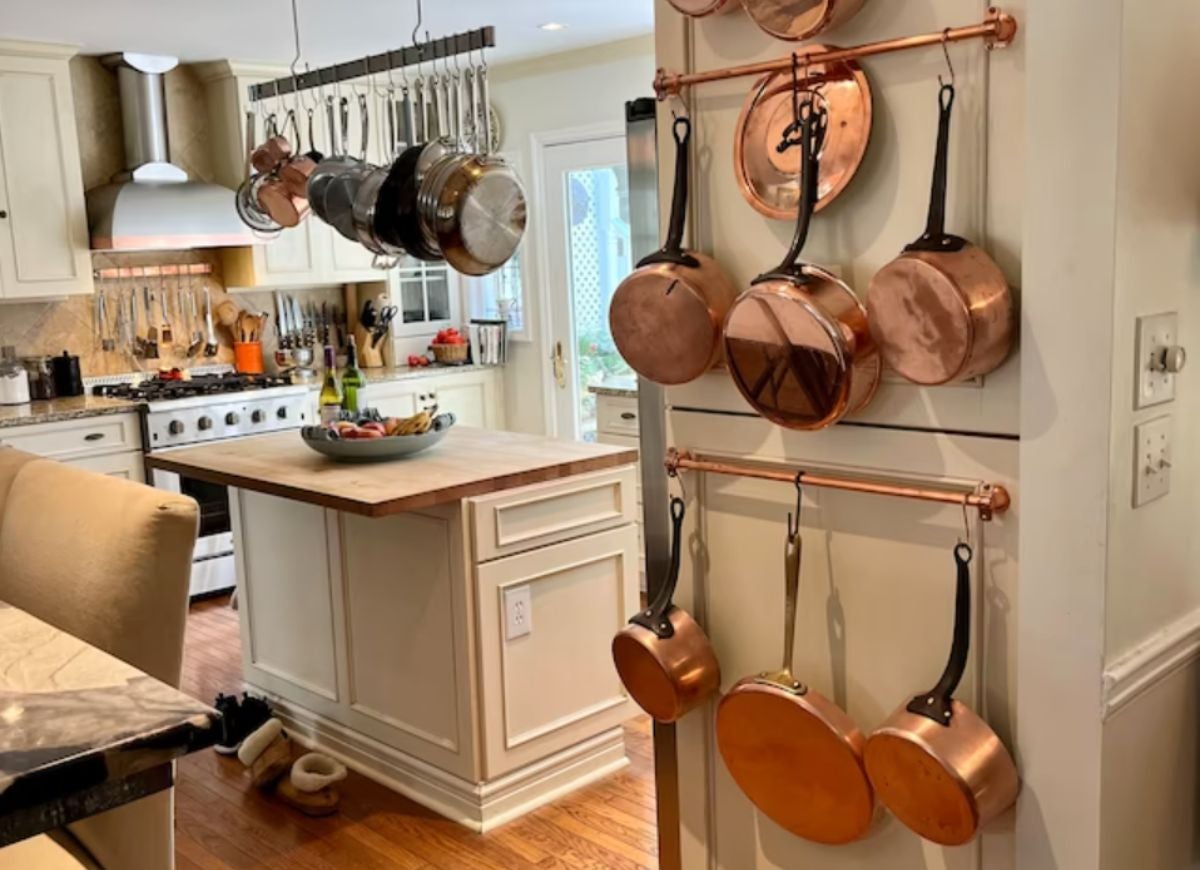
3.Hang pots and pans
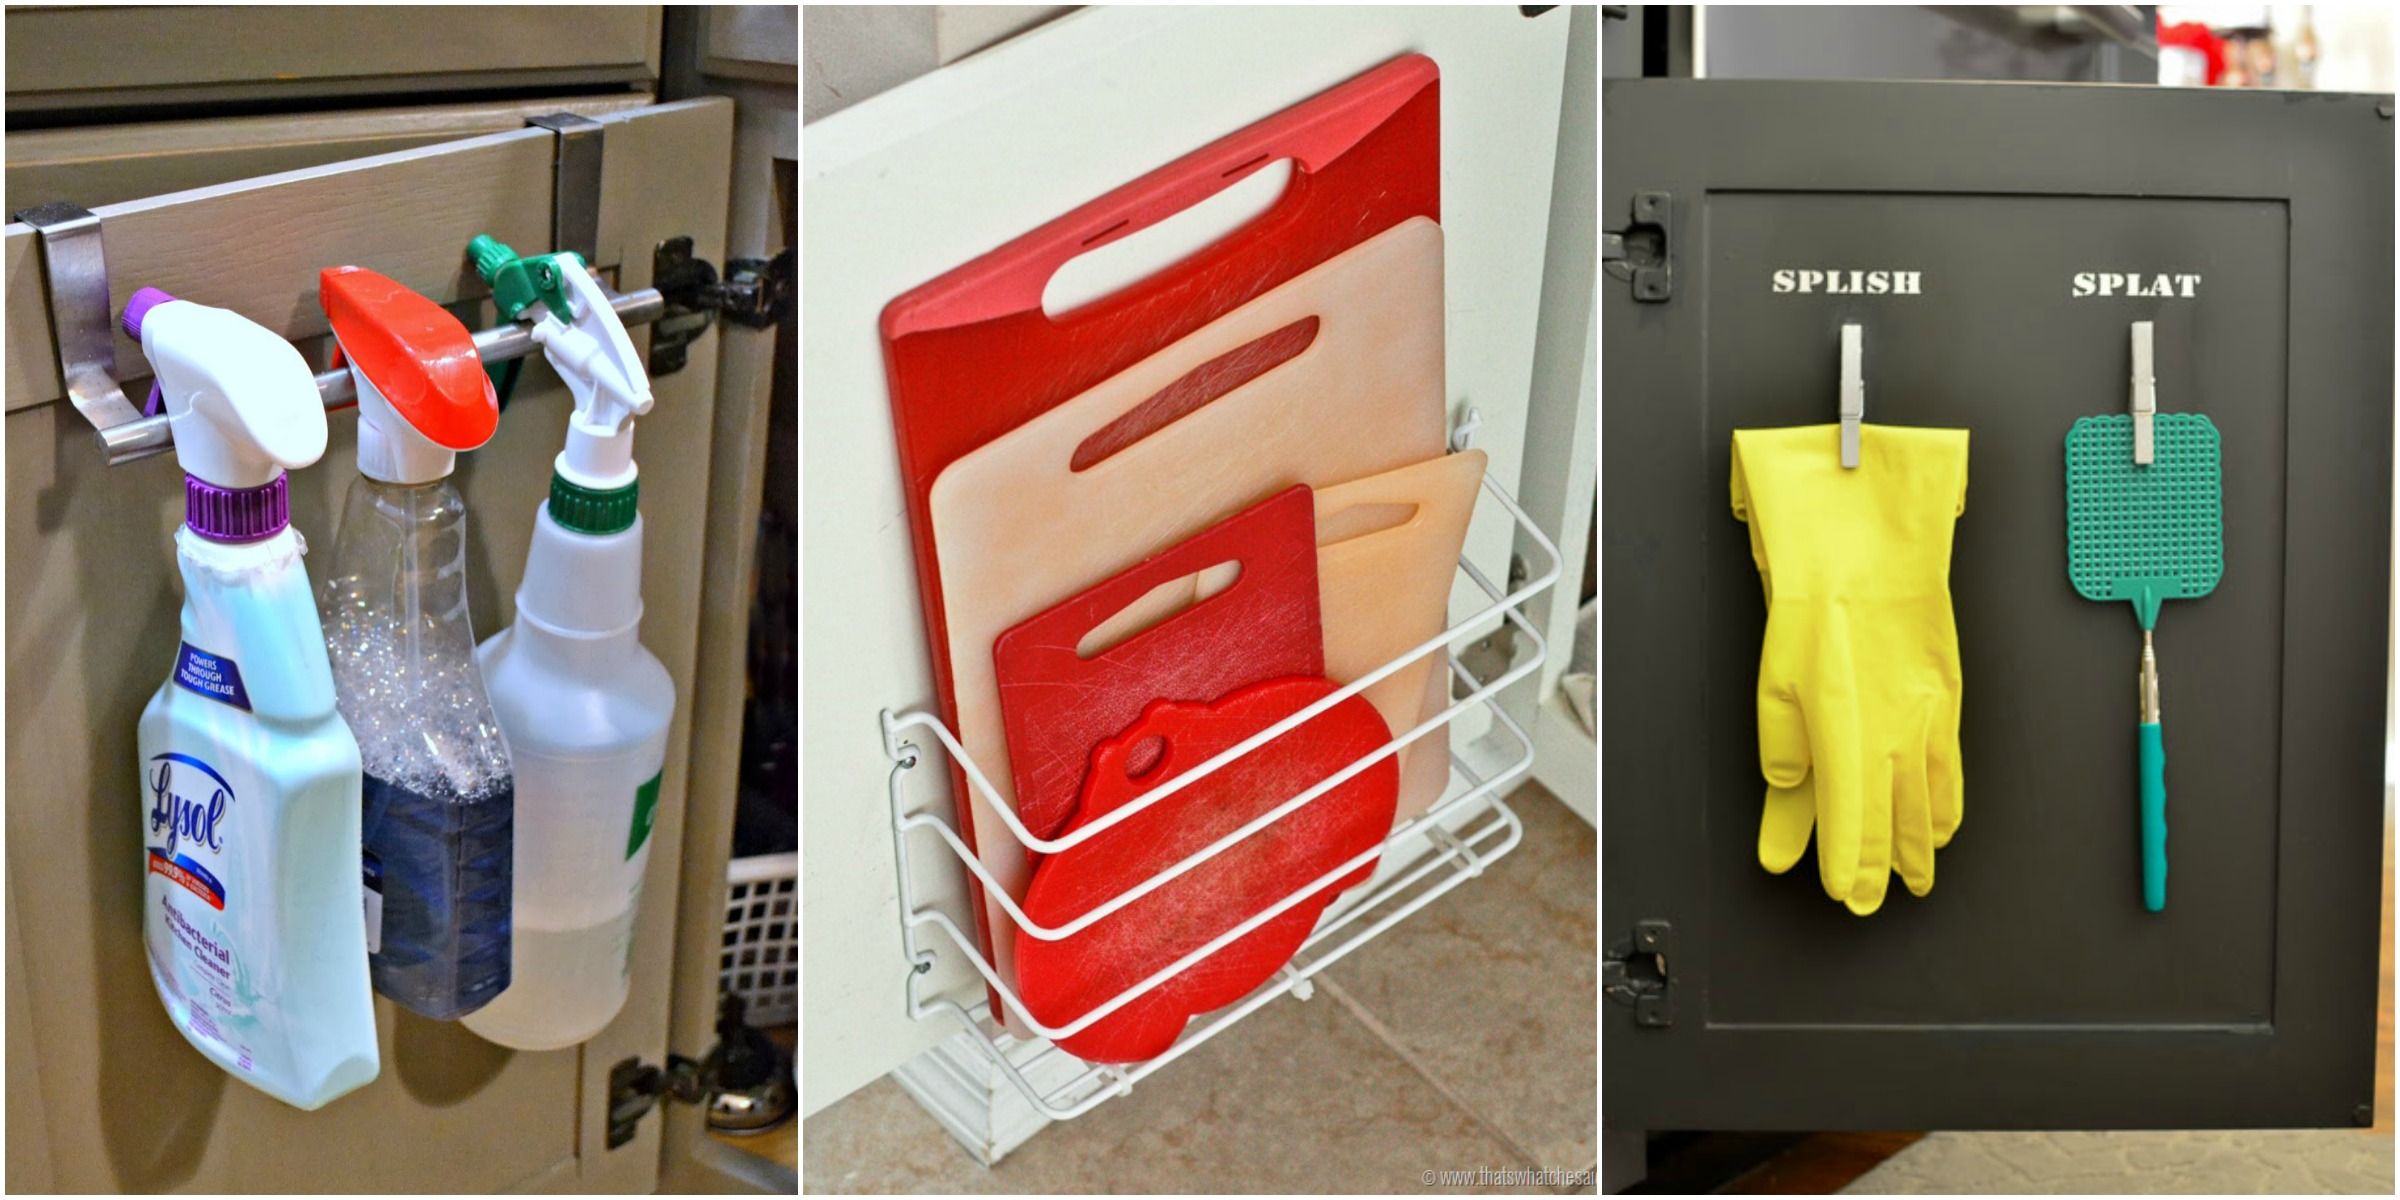
4.Use the inside of cabinet doors
5.Use a magnetic knife holder
6.Install a lazy susan
7.Use a tension rod
8.Use stackable containers
9.Use a rolling cart
10.Hang a pegboard
Install floating shelves
To install floating shelves in your kitchen, you'll need:
• Floating shelf brackets
• Drill
• Screws
• Level
• Stud finder (optional)
• Floating shelves
Here are the steps to install floating shelves:
1. Choose the location for your shelves: Select an empty wall or an area above your countertops where you want to install your floating shelves. Use a stud finder to locate the studs in the wall, as you will need to attach the brackets to the studs for added stability.
2. Install the brackets: Once you have determined the location for your shelves, use a level to mark the location for the brackets. Make sure that the brackets are level with each other. Use a drill to attach the brackets to the wall with screws. If you are attaching the brackets to studs, use long screws to ensure a secure fit.
3. Add the shelves: Once the brackets are installed, slide the floating shelves onto the brackets. Make sure that the shelves are level, and adjust the brackets if necessary.
4. Secure the shelves: Depending on the type of floating shelves you have, you may need to secure them to the brackets with screws or adhesive. Follow the manufacturer's instructions to ensure a secure fit.
5. Decorate your shelves: Once your shelves are installed, you can decorate them with your favorite kitchen essentials such as plates, bowls, glasses, and decorative items.
Use pull-out drawers
To use pull-out drawers in your kitchen, you'll need:
• Pull-out drawer hardware
• Measuring tape
• Drill
• Screws
• Drawer slides
• Plywood
• Saw
• Drawer fronts
Here are the steps to use pull-out drawers in your kitchen:
1. Measure your cabinets: Measure the interior dimensions of your cabinets to determine the size of the pull-out drawers you will need. You can purchase pre-made pull-out drawers or make your own using plywood.
2. Cut the plywood: Using a saw, cut the plywood to the size you need for your pull-out drawers.
3. Attach the drawer slides: Attach the drawer slides to the sides of the cabinet using screws. Make sure that they are level and even on both sides.
4. Attach the drawer hardware: Attach the pull-out drawer hardware to the back of the plywood, making sure that it is centered.
5. Attach the drawer fronts: Attach the drawer fronts to the plywood using screws.
6. Install the pull-out drawers: Once the pull-out drawers are assembled, slide them into the cabinet using the drawer slides.
7. Test the drawers: Test the drawers to make sure that they slide in and out smoothly.
Pull-out drawers can be used to store pots, pans, baking sheets, and other bulky items, making it easier to access items at the back of the cabinet. This will help you maximize your kitchen storage space and keep your kitchen organized.
Hang pots and pans
To hang pots and pans in your kitchen, you'll need:
• A pot rack or hanging system
• Measuring tape
• Pencil
• Drill
• Screws
• Anchors (if needed)
Here are the steps to hang pots and pans in your kitchen:
1. Choose a location: Choose a location for your pot rack or hanging system that is within easy reach of your stove and does not obstruct other kitchen activities.
2. Measure the space: Use a measuring tape to measure the space where you want to hang your pots and pans. This will help you determine the size of the pot rack or hanging system you need.
3. Mark the location: Use a pencil to mark the location for the screws that will hold the pot rack or hanging system. Make sure that the marks are level and evenly spaced.
4. Drill pilot holes: Use a drill to create pilot holes for the screws. If you are attaching the pot rack or hanging system to drywall or plaster, use anchors to ensure a secure fit.
5. Install the pot rack or hanging system: Once the pilot holes are drilled, attach the pot rack or hanging system to the wall using screws.
6. Hang your pots and pans: Hang your pots and pans from the pot rack or hanging system using hooks or other attachments.
Hanging pots and pans will help you save cabinet space and make it easier to access your cookware. Plus, it can add a stylish and functional element to your kitchen décor.
Use the inside of cabinet doors
To use the inside of cabinet doors in your kitchen, you'll need:
• Adhesive hooks
• Measuring tape
• Pencil
• Command strips (optional)
• Storage containers or baskets
Here are the steps to use the inside of cabinet doors in your kitchen:
1. Choose the location: Choose the inside of a cabinet door that is within easy reach and does not interfere with other cabinet contents.
2. Measure the space: Use a measuring tape to measure the space where you want to add storage containers or baskets. This will help you determine the size of the containers or baskets you need.
3. Mark the location: Use a pencil to mark the location for the adhesive hooks or command strips that will hold the containers or baskets.
4. Attach the hooks or command strips: Attach the adhesive hooks or command strips to the marked location on the inside of the cabinet door. Make sure that the hooks or command strips are level and evenly spaced.
5. Hang your containers or baskets: Once the hooks or command strips are attached, hang your containers or baskets from them.
6. Organize your items: Use the containers or baskets to organize your kitchen items such as cleaning supplies, sponges, measuring cups and spoons, and other small items.
Using the inside of cabinet doors is a great way to maximize your kitchen storage space, especially in small kitchens where cabinet space is limited. It can also help keep your kitchen organized and tidy.
Use a magnetic knife holder
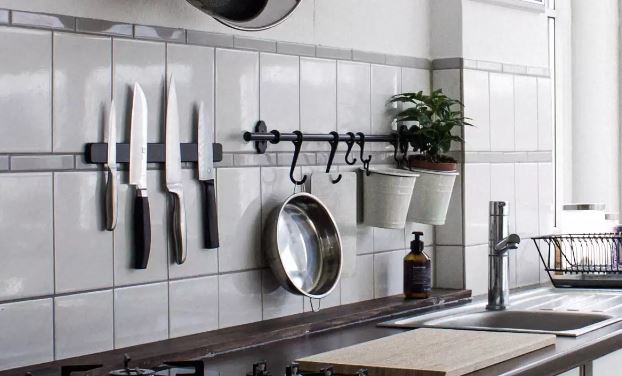
To use a magnetic knife holder in your kitchen, you'll need:
• A magnetic knife holder
• Measuring tape
• Pencil
• Drill
• Screws
• Anchors (if needed)
Here are the steps to use a magnetic knife holder in your kitchen:
1. Choose a location: Choose a location for your magnetic knife holder that is within easy reach of your food preparation area and does not obstruct other kitchen activities.
2. Measure the space: Use a measuring tape to measure the space where you want to install the magnetic knife holder. This will help you determine the size of the knife holder you need.
3. Mark the location: Use a pencil to mark the location for the screws that will hold the magnetic knife holder. Make sure that the marks are level and evenly spaced.
4. Drill pilot holes: Use a drill to create pilot holes for the screws. If you are attaching the knife holder to drywall or plaster, use anchors to ensure a secure fit.
5. Install the magnetic knife holder: Once the pilot holes are drilled, attach the magnetic knife holder to the wall using screws.
6. Hang your knives: Hang your knives from the magnetic knife holder.
Using a magnetic knife holder in your kitchen is a great way to save counter space and keep your knives organized and easily accessible. Plus, it can add a stylish and modern element to your kitchen décor.
Install a lazy susan
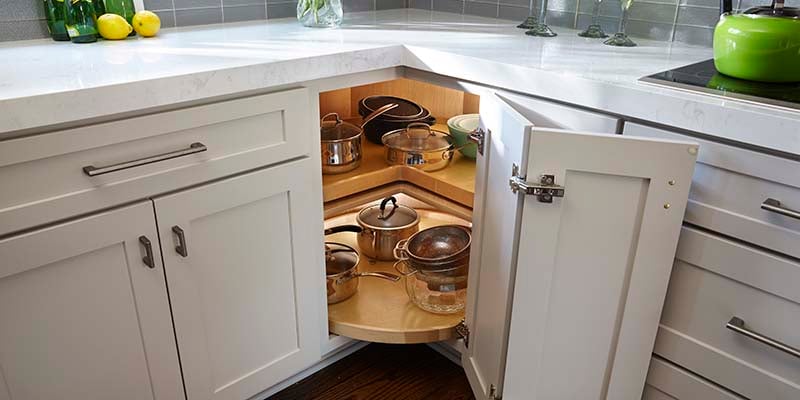
To install a lazy susan in your kitchen, you'll need:
• A lazy susan kit
• Measuring tape
• Pencil
• Drill
• Screws
• Anchors (if needed)
Here are the steps to install a lazy susan in your kitchen:
1. Choose a location: Choose a location for your lazy susan that is within easy reach and does not interfere with other kitchen activities.
2. Measure the space: Use a measuring tape to measure the space where you want to install the lazy susan. This will help you determine the size of the lazy susan you need.
3. Mark the location: Use a pencil to mark the location for the screws that will hold the lazy susan. Make sure that the marks are level and evenly spaced.
4. Drill pilot holes: Use a drill to create pilot holes for the screws. If you are attaching the lazy susan to drywall or plaster, use anchors to ensure a secure fit.
5. Install the lazy susan: Once the pilot holes are drilled, install the lazy susan kit according to the manufacturer's instructions. This usually involves attaching a base plate to the bottom of the cabinet and then attaching the rotating mechanism to the base plate.
6. Add your items: Once the lazy susan is installed, add your kitchen items such as spices, condiments, or canned goods.
Using a lazy susan in your kitchen is a great way to maximize your cabinet space and keep your kitchen organized. It allows you to easily access items in the back of your cabinet without having to remove everything in front of it. Plus, it can add a functional and stylish element to your kitchen décor.
Use a tension rod
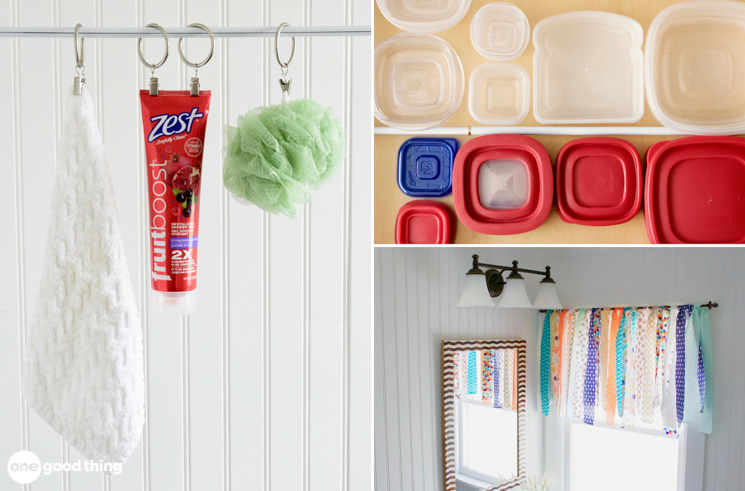
To use a tension rod in your kitchen, you'll need:
• Tension rod
• Measuring tape
• Pencil
• Cleaning supplies or other items to organize
Here are the steps to use a tension rod in your kitchen:
1. Choose a location: Choose a location for your tension rod that is within easy reach and does not interfere with other kitchen activities.
2. Measure the space: Use a measuring tape to measure the width of the space where you want to install the tension rod. Make sure to measure the space accurately to ensure a proper fit.
3. Adjust the tension rod: Adjust the tension rod to the correct size by twisting the rod until it fits snugly in the space.
4. Hang your items: Once the tension rod is in place, hang your items such as cleaning supplies, dish towels, or pot holders.
Using a tension rod in your kitchen is a simple and inexpensive way to add storage space and keep your kitchen organized. It allows you to use the vertical space in your cabinets or pantry to store items that would otherwise take up valuable counter or shelf space. Additionally, tension rods are easy to install and can be easily removed or adjusted if needed.
Use stackable containers
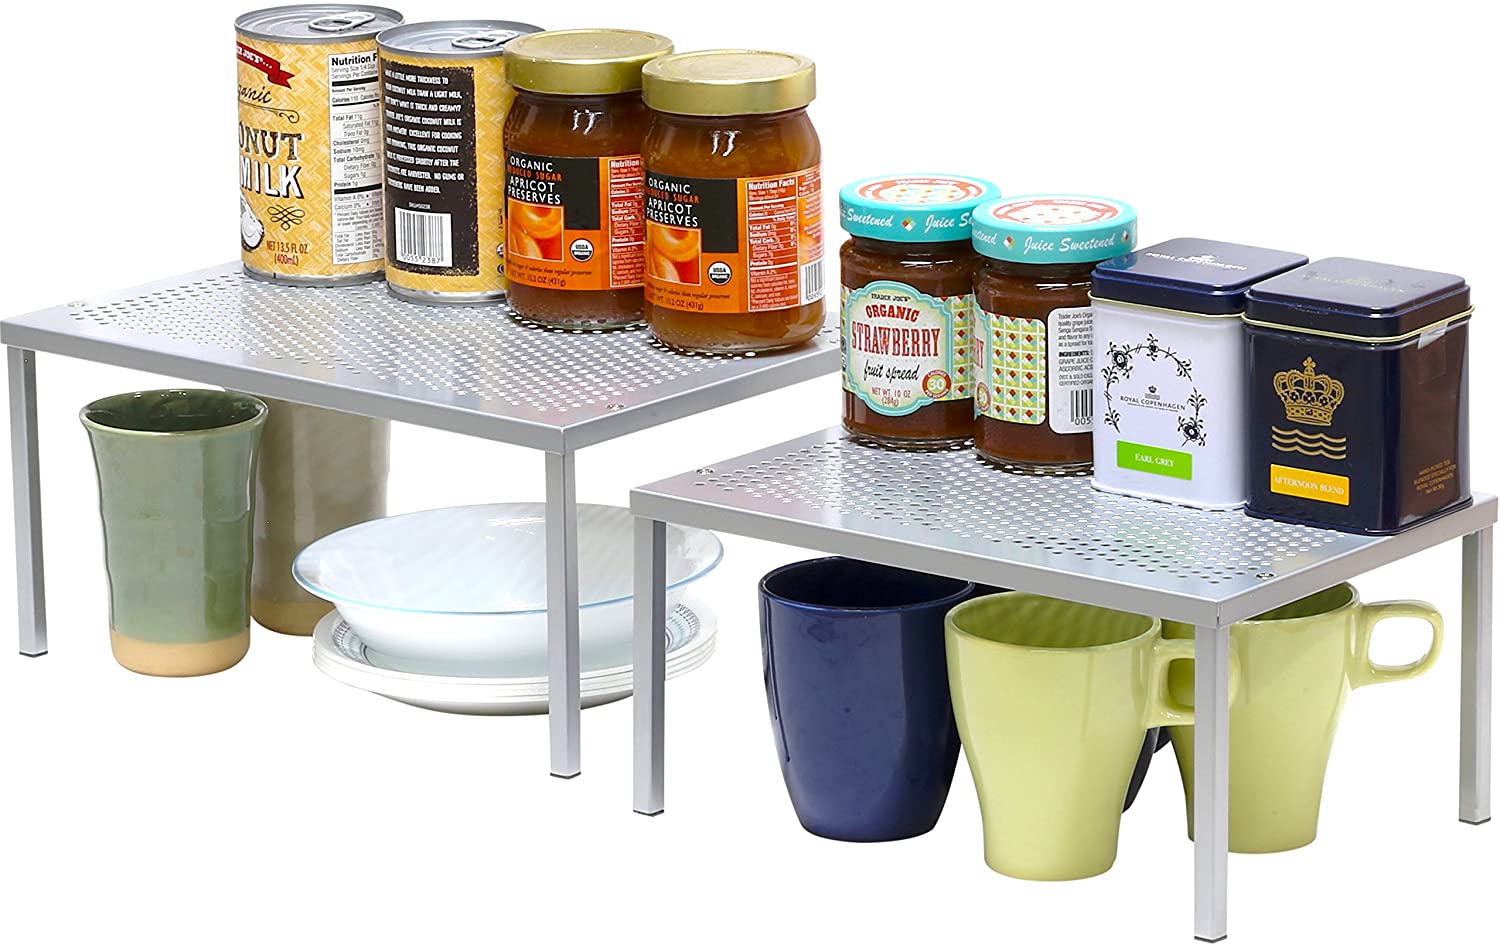
To use stackable containers in your kitchen, you'll need:
• Stackable containers
• Measuring tape
• Pencil
• Label maker (optional)
Here are the steps to use stackable containers in your kitchen:
1. Choose a location: Choose a location for your stackable containers that is easily accessible and does not interfere with other kitchen activities.
2. Measure the space: Use a measuring tape to measure the width, height, and depth of the space where you want to store your stackable containers. This will help you determine the size and number of containers you need.
3. Choose the containers: Choose the stackable containers that best fit the space and the items you want to store. Make sure the containers are sturdy and have tight-fitting lids to prevent spills and keep the contents fresh.
4. Label the containers: Label the containers using a label maker to identify the contents. This will help you quickly find what you need and keep your kitchen organized.
5. Stack the containers: Stack the containers in the designated space, making sure to stack them securely and in a way that allows you to easily access the items inside.
Using stackable containers in your kitchen is a great way to maximize your storage space and keep your kitchen organized. They are particularly useful for storing dry goods, snacks, or baking supplies. Plus, they are stackable, which means they take up less space than traditional containers and can be easily stored in a pantry or on a shelf. Additionally, labeling the containers can save you time and prevent you from having to dig through several containers to find what you need.
Use a rolling cart
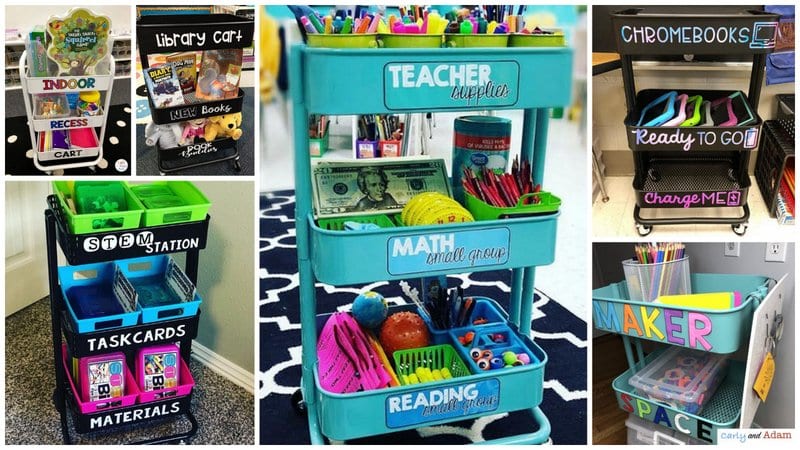
To use a rolling cart in your kitchen, you'll need:
• Rolling cart
• Measuring tape
• Pencil
• Cleaning supplies, spices, or other items to organize
Here are the steps to use a rolling cart in your kitchen:
1. Choose a location: Choose a location for your rolling cart that is easily accessible and does not interfere with other kitchen activities.
2. Measure the space: Use a measuring tape to measure the width, height, and depth of the space where you want to store your rolling cart. This will help you determine the size and style of the cart you need.
3. Choose the cart: Choose the rolling cart that best fits the space and the items you want to store. Make sure the cart has wheels that move easily and locks to keep it in place when necessary.
4. Organize the cart: Organize the cart by grouping similar items together. For example, you can use the cart to store cleaning supplies, spices, or baking tools.
5. Roll the cart into place: Once the cart is organized, roll it into place and lock the wheels to keep it from moving.
Using a rolling cart in your kitchen is a great way to add extra storage space and keep your kitchen organized. It is particularly useful if you have limited cabinet or counter space. Plus, the cart is mobile, which means you can easily move it to different locations in your kitchen depending on your needs. Additionally, a rolling cart can add a decorative element to your kitchen décor and can be easily customized to fit your personal style.
Hang a pegboard
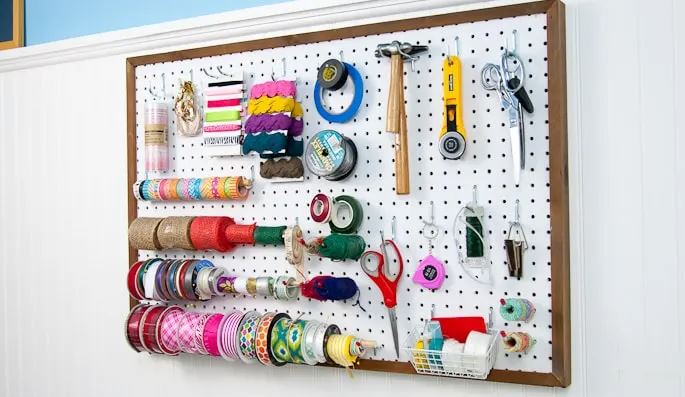
To hang a pegboard in your kitchen, you'll need:
• Pegboard
• Measuring tape
• Pencil
• Drill
• Screws
• Pegboard hooks and accessories
• Level (optional)
Here are the steps to hang a pegboard in your kitchen:
1. Choose a location: Choose a location for your pegboard that is easily accessible and does not interfere with other kitchen activities.
2. Measure the space: Use a measuring tape to measure the width and height of the space where you want to hang your pegboard. This will help you determine the size of the pegboard you need.
3. Choose the pegboard: Choose the pegboard that best fits the space and the items you want to store. Make sure the pegboard is sturdy and has pre-drilled holes for easy installation.
4. Mark the holes: Use a pencil to mark the holes for the screws on the wall where you want to hang the pegboard.
5. Drill the holes: Use a drill to create pilot holes for the screws in the marked locations.
6. Hang the pegboard: Hang the pegboard on the wall using the screws, making sure it is level and secure.
7. Attach the hooks and accessories: Once the pegboard is hung, attach the hooks and accessories to store your kitchen tools and equipment.
Using a pegboard in your kitchen is a great way to add extra storage space and keep your kitchen organized. It allows you to easily store and access your kitchen tools and equipment, such as pots and pans, utensils, and cutting boards. Plus, a pegboard can add a decorative element to your kitchen décor and can be easily customized to fit your personal style. Additionally, a pegboard is a flexible storage solution that can be easily adjusted and reconfigured as your needs change over time
Related posts:

Dianthus flowers, commonly known as carnations or pinks, are popular garden flowers appreciated for their colorful blooms and pleasant fragrance. Here are some guidelines on how to grow and care for Dianthus flowers:

New Year's Decorations, Ideas, and Recipes. Make your New Year's Eve party the talk of the town with cool recipes, trendy decorations, and some fun ideas. Decorate your home beautifully with Balloon decorations this New Year 2024. Make your room,...
 How to grow and care for Dianthus flowers?
 New Year party decoration ideas for home
 Best Eco-Friendly Home Designs In India
 Real Estate Investing
 7 Open House Food Ideas